Daisypath Anniversary tickers

Little N

Lilypie Kids Birthday tickers

Little M

Lilypie First Birthday tickers
Showing posts with label Celebrations. Show all posts

Saturday, February 28, 2015

CNY 2015

This chinese new year is a quiet one for us. Hubby's grandpa passed away so we are not able to 拜年 or give hong baos. 

The cny eve dinner was at my place for convinience so that I did not need to travel with my three kiddos in tow. Instead of the usual steamboat, we had western meal. Which makes up of BBQ pork rib, roasted corn on cob & vegetable and classic cabonara. The minestrone soup was a frozen pack from Fazzler. ;) 


The kids enjoyed the classic cabonara and of course the chocolate fondue which followed. The dessert was unplanned so there was very little strawberries to go around... 


According to my mil, the kids can still wear nice CNY clothes. I did very last minute shopping at chinatown (alone) and landed with clothes for the two girls, nephew and hubby. The highlight for me was of course 日日红麻辣香锅!lolz. Hey it's addictive and I love it to bits! 

Prior to buying gai gai clothes, there was shopping around for didi's very first set of  CNY clothes... 


This was bought from Giant. ;) very nice looking set at not very cheap price... Haha but it's his first so it better look good! On first day of the new year, he got his first angpow from the 老板娘 of hubby's favourite wanton noodle store. 


The remaining days of CNY were spent with more eating... @ Radin Mas CC for a grassroot gathering. 


Saturday, January 11, 2014

Baby M's first year birthday bash - the preparation...

Baby M's birthday celebration planning started simple- we had wanted it to be elsewhere and for N and other kids to have lots of fun. With the help of a friend, we manage to secure the Aloha chalet 3 months in advance. The good thing about the chalet is it came with 2 square tables and 20 plastic (those kopitiam type) chairs! Perfect for big gatherings/party.

PS: we had a good laugh at "Jacana" - "jiak ka na"-hokkien for eating preserved olives

PARTY THEME

Somehow rainbow just popped in my mind - happy and full of hope. Hubby thought that it would be fun to tie the theme to the 2014 horoscope - Horse. I was quite crazy about "My little pony" and with rainbows it was natural that Rainbow Dash became the chosen party mascot. With the theme settled, I did an amateurish looking invitation which was sent to guests...
This time round hubby also did a DIY photo shoot for mei mei - and I found a photo with her "signature" smile to put in the invite...


A separate "reminder" invite was also given to guests who were coming one day before the party. ;) 


ACTIVITY PREPARATIONS

Preparations started two months prior to the party. The idea was to have activities that will keep N and other kids entertained. The choice for me was clear- art related activities such as window art... (Sand art was too messy to my liking- IMHO) So the hunt for a vendor started. There were event companies which provided the service at exorbitant prices and the cheapest vendor I could find was not available.... (Sigh)

Beads Station
Disappointed, I explored an activity which was featured by an event company- using beads to make key chains or bracelets. Lucky for me I managed to find a cheap supply of raimbow coloured beads and accessories (including rainbow coloured string) from Taobao. Just a week before the party, I got N to sit with me to sort the alphabet beads... ;p as you can see from the picture, we were only half way thru' the big bag of beads!!!


Foam Art (Photo Frame)
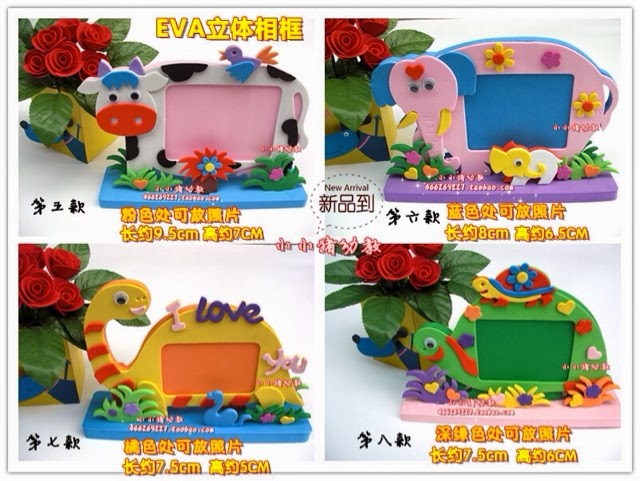
The other activity which was planned was for the kids to make a foam art photo frame. The original intention was to use my phone to take pictures for the guest and print them out using the Canon Selphy. Hubby warned me that I was trying to do too much! *bleah* But it was too late- I had ordered the foam art from Taobao and it was on its way to Singapore! So the kids would do the foam art on the spot or bring them home to do. :)


Tattoo/ Face painting 
I met this lady during a Christmas road show at AMK hub. She was doing face painting for kids with an event company. I was impressed because she drew very well. I took the opportunity to ask if she could do free lance. She agreed and gave me her telephone number. Closer to the date, she told me to choose 8 characters. You can see the 8 characters below (yes! It included minions because I thought most of the boys won't want a pony tattoo...)


As you can see here, she actually practised at home prior to the event (see below). I asked if she had photos of the tattoos she drew during my party. I guess she was too busy with the never-ending supply of kids wanting to get tattoos so she gave me her practise photos. Such dedication! What more could I ask for! Her name is Sufang and you can contact her at 9652 9630 if you are interested in getting her for your party. ;)


Piñata!


I first broached the idea to hubby who was a hesitant about the feasibility. I convinced him that doing a "1" would be super simple using cardboards which we had plenty at home. Hubby was naturally horrified when he learnt that piñata was meant to be beaten till broken.  He was later convinced by a non-violent version - the pull string piñata. During my research, I saw a dad who did an impressive Beagle piñata tutorial (which I also showed hubby for fun). 


Almost 2 weeks left to the party, there was still no piñata!!! With the stress of "delivering" what the invite promised, we finally got down to it. To which, hubby enthusiastically announced: "Let's do a pony piñata! The video looks simple enough...". And so, the nightmare of ME slogging to complete the piñata began... 


Step 1- Create a paper mache ball (a blown up balloon was used) as the tummy to hold sweets in the piñata... 


Step 2 - After the balloon paper mache is dry, hubby used strips of cardboard to build a skeleton around the balloon for the body and head... Empty cans were used for the legs... 


Step 3: I was supposed to fill the gaps with newspaper to puff the pony into shape (i forgot!) before paper mache-ing the whole thing.


I DIY-ed about 3 batches of starch (see photo) to complete the mache for the whole pony.


Step 4: Hang up the whole thing for it to dry! As you can see the pony looks odd because I did not feel the gaps with paper to puff it up... :( 


Step 5: COLOUR the pony. The video tutorial showed the guy spray painting it. That's the fastest method since the paint would cover up the newspaper mache "prints"... I didn't want to spend more money buying spray paint so I used masking tape to tape up the whole pony and painted it blue (colour of Rainbow Dash) using N's Crayola paint... 


Step 6: Add the finishing touches... Hubby used cardboard to cut out the wings and ears... I dyed the cotton twine using N's Crayola paint. The eyes and logo was printed from the computer and cut into shape for pasting. Finally, the Rainbow Dash piñata was "born" in the nick of time - on Thursday - 2 days before the party! (PHEW!) All that was left was to cut the bottom and fill it up with SWEETS!


THE MAMA-SHOP CORNER 


This was mainly an inspiration from a Dec 08 mummy Jinny's  birthday bash for her #2. She had a really pretty candy table which she DIY-ed. Hubby supported the idea so I got down to planning "rainbow" items for the table. I went crazy wanting to buy fruit loops, Paddle pop ice cream, yakult, jelly beans and everything rainbow. Hubby brought me back to Earth with "Hey don't go overboard hor!". 


And so, with hubby's warning in mind, I searched around for a "cheap" candy source. Finally chanced upon a shop which not only sold candies but also some old school snacks. I secretly decided to make half the table offer "retro snacks". Hubby was working on Friday so I went to the candy shop alone - if hubby's warning wasn't ringing at the back of my mind I would have bought everything on the shelves! 


Inspired by Jinny, hubby said we could do bottle labels like her too. So 3 designs were put out and hubby chose the rainbow (though I got most votes for the polka dot one). 


They were initially printed on normal paper but tore off easily when wet. The labels were eventually printed on photo paper instead... 


I also printed little cake toppers for the Twelve cupcakes (mini) which my younger sister sponsored for the party... These were also printed on photo paper and cut out using a circle cutter... Toothpicks were pasted behind the paper. ;) 


The final DIY item on the table was rainbow agar agar/jelly. With the help of my niece, nephew and N, we made the jelly on the night before the party... 


DECORATIONS 


Hubby took charge of the fancy decorations and I manage to "coerce" my poor brother in law to blow balloons for me and hang them up on the day of the party. It was during this  "fancy decoration" exercise, that I learnt of my nephew and hubby's talent in balloon sculpting... My nephew was so addicted he could not stop making dogs, swords, flowers and many other designs from the balloons. 


Hubby made three of these and my nephew made one. Not too bad I must say for amateurs like my nephew and hubby. ;) 


Look out for my next post - on the day of the celebrations...

Saturday, November 30, 2013

Santa Handprint DIY Salt Dough

There was some time between lunch and N's ballet at 4pm. Baby M was sleeping and we could do a short activity together. 

I first saw this on facebook and decided to save a picture of it on my handphone's photo album. It is an activity I plan to do during the upcoming xmas party gathering with colleagues. There would be about 5 kids and it should be fun! Furthermore I had bags of expired baking flour, rather than dump them. Make art! ;)

The dough mixture was really sticky and i had to put more flour! :/ I added a little oil to the mixture to smooth it out too... 

Read online that baking the dough takes ages and microwaving is faster. As my dough was quite thick, the dough was microwaved for 2 minutes sandwiched between 2 plates and for about 1.5 minutes without the top plate. 
 
 
I retrieved the plate aft every min to check if the dough was hard. The middle took the longest to harden. The final product before colour. Somehow the dough bloated which is why the palm area was not flat... Cute isn't it? 


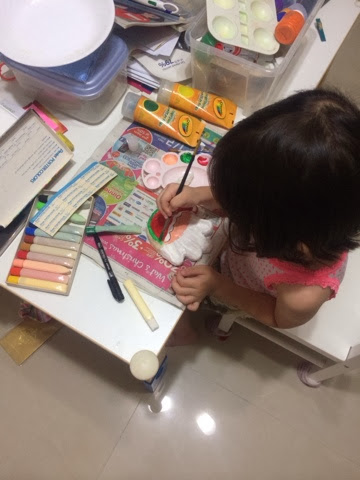
When the dough cooled down, N started her hands on painting it. 

To guide her along, I drew the outline of santa's cap for her to paint. Tip: For a vibrant colour, we did not make the paint too watery... 


N decided another colour was needed for the clay to make it more colourful... So there is green! 

After adding the eyes nose and N insisted a smiley mouth. Here is her dough handprint santa... ;) 


Wednesday, December 12, 2012

Happy Birthday!

The little gal is turning four this year. Since it's the last birthday as an only child, this birthday celebration was kind of special and I made it a point to start planning early.

She wanted a "princess" birthday party due her (over)exposure of Disney DVD cartoons like Cinderella, Rapunzel, Beauty and the Beast, Little Mermaid and Snow White & the Seven Dwarfs. For some reason, she loves Snow White the most. The theme then evolved from "Princesses" to "Snow White".

I started my search for the cake topper about 5 months prior but could not find one that could make me go "OK! This is the one!". In early November, the frenzy started since figurines/toppers from US Disney would take some time to reach Singapore. I then sought help from a colleague to see if she knew where I could get decent toppers (not those where Snow White has small slits for her eyes). Well, I finally found one sold on the SMH forum!

Two weeks before the "birthday party", another frenzy  moment took place as we hunted for THE birthday cake design. Hubby felt that a "garden theme" cake would go with the topper and sure enough, it did!

Then it was on to the ding-dong-ing back and forth with Pine Garden (via email) for the design of the cake. Seriously email is surely the most inefficient manner of doing it, so many thanks to hubby, who went down to Pine Garden with our "sweat & tears" art work to place the order. Pine Garden does not do Disney themed cakes so they decorated the cake according to my request and I placed the topper on my own after that.

The teachers and children "Oooooooo-ed" and "Uhhhhhhhh-ed" over the cake. We ordered a 2kg Hazelnut Chocolate Crunch cake and it was moist and soft!  The children were particularly enchanted by the blue cream (yes, can you believe it?), edible lady bugs, strawberries, flowers, snails and of course the fondant words that read Happy 4th Birthday Nicole.

Now, let's just allow the photos to do the talking... :)


The Birthday Cake! :)


More shots with the bright and cherry "Snow White & 7 Dwarf" birthday cake.
 
The family shot :)


Kiddos surrounding the cake and little gal blowing out the candle.
 
Cutting the cake and having a HUGE SLICE of the cake! :)


Tuesday, November 20, 2012

Have yourself a merry little Christmas...

It's the end of the year and Christmas lightings are already up along Orchard Road! The little gal kept asking if she could have her own Christmas tree. This being the second year she asked, hubby initially told her that she could go to my neighbour's to see their tree.

Perhaps it's the pregnancy or because she has grown up and I wanted her to have the experience, so I told hubby that we would get one for her this year. Hubby of course jumped at the idea - he wanted a Christmas tree too, the first year we moved into our place. My reaction was "huh? For what?". LOL. The things we would do to win a child's joy and laughter...

Shopped around at both TANGS and GIANT hypermart for the Xmas tree. My criteria was simple, a tree that cost as little as possible but still look decent enough (since the tree will be back in the store room after a year). And this also applies to the deco.

Checked out the prices and decided to get the cheapest one at GIANT... Damage: Xmas tree 1.5m tall ($12.99) + Multi-colored lighting ($19.99) + Ikea Xmas 25 piece deco ($5.90). I know what the reaction will be: the lighting actually cost more than the tree!!! But it's really pretty with bells and snowflakes... ;)

And here are some pics of the little gal decorating the Xmas tree and a picture with the Xmas tree. :) haven't gotten the star so asked Hello Kitty to stand in first...


Tuesday, December 14, 2010

I am 2 years old!!!

The little girl is finally 2 years old! A bundle of energy and wit, a curious little tot who is well loved by all close to her...


Papa and Mama decided to throw her a little birthday party at Beng Hiang Restaurant. It's a cosy restaurant that serves pretty good and reasonably priced Hokkien cuisine. When you celebrate a birthday there, the restaurant will play a "birthday" song (both in English and Chinese) that can be heard by all the diners there.


Here are some pictures to commemorate the special day. :)


* Cheeky smiles all around! 

The Swensens Mickey Mouse Cake 

(This cake has a long story behind it. On the Thursday before the celebration, I went down to Earle Swensens @ Vivo and was told I could not order a cake as they needed 3 working days (which excludes Saturday). Made a mental note that the outlet had the above design but KIVed to reserve it as I hoped the outlet at Bishan would have the same. The Bishan outlet only had xmas log cakes so I quickly called Vivo Earle Swensens to book the cake (above design) for collection on Friday evening - the manager said the cake was available and would place the reservation for me. Was so busy on Friday evening I could not go to collect the cake, tried calling them for close to 10 times and only got the fax tone. On Saturday morning, called the Vivo outlet and was on the phone for almost 5 minutes because the girl could not understand what I was trying to ask her and she took another 3 minutes to take down my phone number. She claims that their phone a bit spoilt!?!! Finally the manager of Vivo Earle Swensens called me back and the earth shattering news: There was no cake reserved under my name and the cake I reserved was not in the fridge already! He offered for me to buy the last Mickey cake and only admitted that the cake's icing was warped after I asked him about it (I already noticed it during my visit on Thurs). He was apologetic and asked me to try the Swensens outlet at Nex. So poor me, ran to the outlet at Ion but did not see any Mickey cakes. Called Nex and placed a booking. Took a train down to that mad house shopping centre to get the cake. Luckily, the little gal loved the cake and so did everyone who was there... On a serious note, I am really disgusted by this whole experience.)

Had a seriously hard time trying to keep her hands off the cake! -__-"


Birthday Girl with Birthday Uncle! 
(PS: The little girl was perhaps feeling a little "paiseh" because the diners next door was singing the "happy birthday" song too! She blew out the two candles on her own too! Well done! :p )


The family (Erhmm... papa anxiously staring at the cake?) 


The two "shou xin gong"s cute the cake together... 


Eyes on the cake! (PS: Mama not so evil to get a cake she can't eat. Haha!)


Evidence: Ah ma feeding her with the cake! Yummy!