Daisypath Anniversary tickers

Little N

Lilypie Kids Birthday tickers

Little M

Lilypie First Birthday tickers

Monday, January 13, 2014

Weaning Recipe - Vegetable Stock

This is a very versatile stock which I love making for weaning babies - its oil free and vegetarian (for parents who don't want to intro animal proteins so early). I make batches of this (enough to last for at least a week) and freeze them using the Avent VIA cups after making them on the weekends. The stocks can be kept frozen up to 2 weeks. Idiot proof - trust me. 


The good thing about stock is you can add them to porridge or even use it as a soup base for steaming veg/meats and even that chawamushi! 


Ingredients 
1. 1/4 to 1/2 of the whole Chinese Cabbage (also known as Wong Bok) ~ the elderly says that its "liang" so you can replace this with Beijing Cabbage 
2. 3-4 stalks of celery
3. 2 large sticks of carrots 
4. 1 stick of corn 
5. 1-2 large yellow onions (depending on size of the onion) - cut into 8 quarters 
6. Tomato (optional, I only add this when baby is older)
7. Chicken/pork/beef bones (if u wan to enhance the flavor/sweetness)

Method
1. Wash and chop up the ingredients. 
2. Throw into pot and add even water to cover all the ingredients. Bring to boil. 
3. Allow to simmer for 1.5 to 2 hrs over stove or until the vegetables are "mushy". 

I don't really like to keep tabs on the stove so I will usually my trusty slow cooker. Which I will set to 4 hours. The stock comes out really nicely and I do not need to worry about the soups boiling over or "drying" up. ;) 

Have fun!

Saturday, January 11, 2014

Baby M's first year birthday bash - the preparation...

Baby M's birthday celebration planning started simple- we had wanted it to be elsewhere and for N and other kids to have lots of fun. With the help of a friend, we manage to secure the Aloha chalet 3 months in advance. The good thing about the chalet is it came with 2 square tables and 20 plastic (those kopitiam type) chairs! Perfect for big gatherings/party.

PS: we had a good laugh at "Jacana" - "jiak ka na"-hokkien for eating preserved olives

PARTY THEME

Somehow rainbow just popped in my mind - happy and full of hope. Hubby thought that it would be fun to tie the theme to the 2014 horoscope - Horse. I was quite crazy about "My little pony" and with rainbows it was natural that Rainbow Dash became the chosen party mascot. With the theme settled, I did an amateurish looking invitation which was sent to guests...
This time round hubby also did a DIY photo shoot for mei mei - and I found a photo with her "signature" smile to put in the invite...


A separate "reminder" invite was also given to guests who were coming one day before the party. ;) 


ACTIVITY PREPARATIONS

Preparations started two months prior to the party. The idea was to have activities that will keep N and other kids entertained. The choice for me was clear- art related activities such as window art... (Sand art was too messy to my liking- IMHO) So the hunt for a vendor started. There were event companies which provided the service at exorbitant prices and the cheapest vendor I could find was not available.... (Sigh)

Beads Station
Disappointed, I explored an activity which was featured by an event company- using beads to make key chains or bracelets. Lucky for me I managed to find a cheap supply of raimbow coloured beads and accessories (including rainbow coloured string) from Taobao. Just a week before the party, I got N to sit with me to sort the alphabet beads... ;p as you can see from the picture, we were only half way thru' the big bag of beads!!!


Foam Art (Photo Frame)
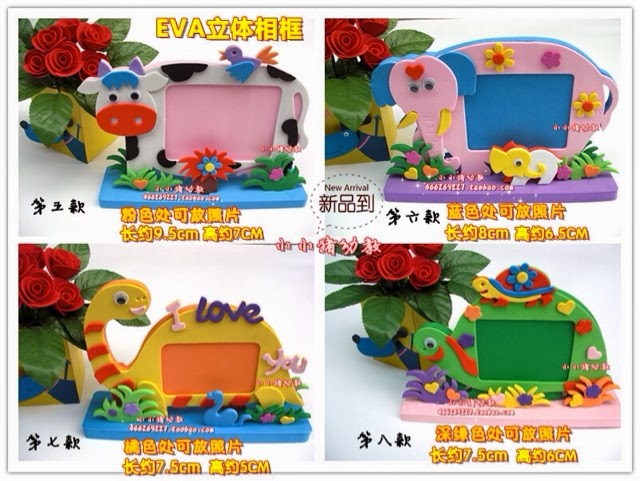
The other activity which was planned was for the kids to make a foam art photo frame. The original intention was to use my phone to take pictures for the guest and print them out using the Canon Selphy. Hubby warned me that I was trying to do too much! *bleah* But it was too late- I had ordered the foam art from Taobao and it was on its way to Singapore! So the kids would do the foam art on the spot or bring them home to do. :)


Tattoo/ Face painting 
I met this lady during a Christmas road show at AMK hub. She was doing face painting for kids with an event company. I was impressed because she drew very well. I took the opportunity to ask if she could do free lance. She agreed and gave me her telephone number. Closer to the date, she told me to choose 8 characters. You can see the 8 characters below (yes! It included minions because I thought most of the boys won't want a pony tattoo...)


As you can see here, she actually practised at home prior to the event (see below). I asked if she had photos of the tattoos she drew during my party. I guess she was too busy with the never-ending supply of kids wanting to get tattoos so she gave me her practise photos. Such dedication! What more could I ask for! Her name is Sufang and you can contact her at 9652 9630 if you are interested in getting her for your party. ;)


Piñata!


I first broached the idea to hubby who was a hesitant about the feasibility. I convinced him that doing a "1" would be super simple using cardboards which we had plenty at home. Hubby was naturally horrified when he learnt that piñata was meant to be beaten till broken.  He was later convinced by a non-violent version - the pull string piñata. During my research, I saw a dad who did an impressive Beagle piñata tutorial (which I also showed hubby for fun). 


Almost 2 weeks left to the party, there was still no piñata!!! With the stress of "delivering" what the invite promised, we finally got down to it. To which, hubby enthusiastically announced: "Let's do a pony piñata! The video looks simple enough...". And so, the nightmare of ME slogging to complete the piñata began... 


Step 1- Create a paper mache ball (a blown up balloon was used) as the tummy to hold sweets in the piñata... 


Step 2 - After the balloon paper mache is dry, hubby used strips of cardboard to build a skeleton around the balloon for the body and head... Empty cans were used for the legs... 


Step 3: I was supposed to fill the gaps with newspaper to puff the pony into shape (i forgot!) before paper mache-ing the whole thing.


I DIY-ed about 3 batches of starch (see photo) to complete the mache for the whole pony.


Step 4: Hang up the whole thing for it to dry! As you can see the pony looks odd because I did not feel the gaps with paper to puff it up... :( 


Step 5: COLOUR the pony. The video tutorial showed the guy spray painting it. That's the fastest method since the paint would cover up the newspaper mache "prints"... I didn't want to spend more money buying spray paint so I used masking tape to tape up the whole pony and painted it blue (colour of Rainbow Dash) using N's Crayola paint... 


Step 6: Add the finishing touches... Hubby used cardboard to cut out the wings and ears... I dyed the cotton twine using N's Crayola paint. The eyes and logo was printed from the computer and cut into shape for pasting. Finally, the Rainbow Dash piñata was "born" in the nick of time - on Thursday - 2 days before the party! (PHEW!) All that was left was to cut the bottom and fill it up with SWEETS!


THE MAMA-SHOP CORNER 


This was mainly an inspiration from a Dec 08 mummy Jinny's  birthday bash for her #2. She had a really pretty candy table which she DIY-ed. Hubby supported the idea so I got down to planning "rainbow" items for the table. I went crazy wanting to buy fruit loops, Paddle pop ice cream, yakult, jelly beans and everything rainbow. Hubby brought me back to Earth with "Hey don't go overboard hor!". 


And so, with hubby's warning in mind, I searched around for a "cheap" candy source. Finally chanced upon a shop which not only sold candies but also some old school snacks. I secretly decided to make half the table offer "retro snacks". Hubby was working on Friday so I went to the candy shop alone - if hubby's warning wasn't ringing at the back of my mind I would have bought everything on the shelves! 


Inspired by Jinny, hubby said we could do bottle labels like her too. So 3 designs were put out and hubby chose the rainbow (though I got most votes for the polka dot one). 


They were initially printed on normal paper but tore off easily when wet. The labels were eventually printed on photo paper instead... 


I also printed little cake toppers for the Twelve cupcakes (mini) which my younger sister sponsored for the party... These were also printed on photo paper and cut out using a circle cutter... Toothpicks were pasted behind the paper. ;) 


The final DIY item on the table was rainbow agar agar/jelly. With the help of my niece, nephew and N, we made the jelly on the night before the party... 


DECORATIONS 


Hubby took charge of the fancy decorations and I manage to "coerce" my poor brother in law to blow balloons for me and hang them up on the day of the party. It was during this  "fancy decoration" exercise, that I learnt of my nephew and hubby's talent in balloon sculpting... My nephew was so addicted he could not stop making dogs, swords, flowers and many other designs from the balloons. 


Hubby made three of these and my nephew made one. Not too bad I must say for amateurs like my nephew and hubby. ;) 


Look out for my next post - on the day of the celebrations...

Saturday, November 30, 2013

Santa Handprint DIY Salt Dough

There was some time between lunch and N's ballet at 4pm. Baby M was sleeping and we could do a short activity together. 

I first saw this on facebook and decided to save a picture of it on my handphone's photo album. It is an activity I plan to do during the upcoming xmas party gathering with colleagues. There would be about 5 kids and it should be fun! Furthermore I had bags of expired baking flour, rather than dump them. Make art! ;)

The dough mixture was really sticky and i had to put more flour! :/ I added a little oil to the mixture to smooth it out too... 

Read online that baking the dough takes ages and microwaving is faster. As my dough was quite thick, the dough was microwaved for 2 minutes sandwiched between 2 plates and for about 1.5 minutes without the top plate. 
 
 
I retrieved the plate aft every min to check if the dough was hard. The middle took the longest to harden. The final product before colour. Somehow the dough bloated which is why the palm area was not flat... Cute isn't it? 


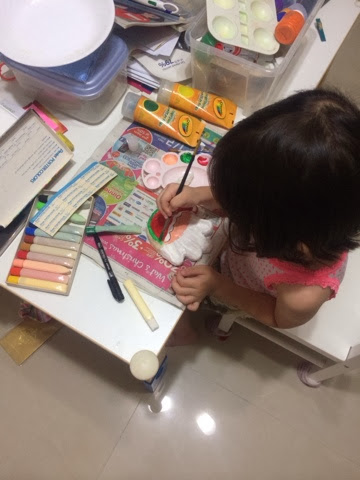
When the dough cooled down, N started her hands on painting it. 

To guide her along, I drew the outline of santa's cap for her to paint. Tip: For a vibrant colour, we did not make the paint too watery... 


N decided another colour was needed for the clay to make it more colourful... So there is green! 

After adding the eyes nose and N insisted a smiley mouth. Here is her dough handprint santa... ;) 


Friday, August 16, 2013

Weaning diaries...

With the breastfeeding going smooth so far, weaning became something that was placed far back in my mind. I was dragging my feet when it came to weaning baby M. Furthermore, my GP told me that baby M should wean later at about 6 months old, since she seemed to show signs of sensitiveness to dust (a sign of allergy). 

Having weaned baby N at 4 months, I was getting nervous about weaning baby M almost 2 months later. And to make things worse, the 5 year gap made recollection of weaning difficult. As with all textbooks, we start with rice cereal with EBM. Baby M did not take it too enthusiastically, in fact she didn't like it. I was constantly struggling to keep the cereal in her mouth. Baby N started cereals early so by this age she was eating pretty well. 


After 2 weeks of cereal, I started to puree   pumpkin for baby M. Yup it was disaster! Feed was a nightmare of trying to stuff the food into her mouth... Despite that, I continued to make other purees like carrots, potato and beetroot.


After one last feeding of pumpkin and spinach puree, it was a war of making her open her mouth for the food. *horror* I tearfully asked hubby why my kids were so "hard" to wean? After showing mother-in-law the "spoils of war" photo (which is missing from my phone and i have no idea why), she suggested I started making porridge.

The first porridge i made from rice + millet + red quiona + carrot was an instant hit! No more trying to stick the spoon into her mouth. She opens her mouth for the food. 


With the porridge going well, I started to make variations of the porridge by adding different sweet vegetables (carrots, sweet potato- the orange and purple variety and pumpkin). After that it was adding a green veg to the porridge, so there would be a sweet vegetable + a green veg (spinach, broccoli). Worried about the iron content, I began to mix fortified cereal into the porridge. 

This photo shows jap sweet potato porridge with Barley cereal from Healthy Times. 
 

Introduced protein - fish (ikan kurau or threadfin) to her at 7 months 1 week old. 

2 days later, she was given chicken porridge ( first photo is the chicken puree and the porridge base with carrots). 


There is much lesser creativity when it comes to porridge. So other than the ingredients, the way forward is to vary the grains. In fact, studies have shown that white rice has the least nutrients. So I do own cocktail of grains. :p 


Baby M is not much of a fruits baby. Suprising since fruits are naturally sweet. She prefers savoury stuff hence the preference for porridge vs Nestle Cerelac (which contains sucrose/sugar). I did give her some apple puree which she rejected all 3-4 times, including the gerber jar! She does take some banana - depending on her mood! Was telling hubby that maybe I did not eat as much fruits while pregnant with baby m versus the one slice of papaya per day with baby n in my tummy! :)

Weaning is so much fun! Yipppe! 

Tuesday, July 09, 2013

The almost sad post...

Was happily going about the usual routine and going to bed when I realised that I have not prepared sterilised bottles and pump parts for work the next day. Shot out of bed and suddenly remembered that my EBM were not in the fridge yet. 

Frantically looked for the black medela ice bag but could not find it at home. Ran down to the car and found the bag in the car. Luckily, the ice brick was still cold and the ebm safely chilled *phew!*

In fact after 5 hours, the blue ice brick was still doing a great job - I could see that the EBM was beginning to separate as they will when in the chiller... 

Here is a grim reminder that I wont be so lucky the next time I forget them... :( 


Tuesday, June 04, 2013

Bloom and Teeny Weeny Photo Shoot (Overdue post)


After getting pregnant a second time, I wasted no time in telling hubby that I wanted to have a maternity photo shoot. The photo shoot would entail some artistic bare it all shots. Hubby was of course apprehensive at first until I told him that I will try to choose a studio with a female photographer. What I wanted to do was to capture the rare moments of a stretched tummy with a baby inside and of course while my skin is still smooth...  

I shortlisted a few photo studios which were known to take really nice maternity photos and studios or free lancers who have just joined this lucrative business. As I was looking around, the Parenthood Fair came along and one of my top choice studio actually had a promo! As luck would have it, I only needed to pay $500 for maternity and newborn photo shoot! I slept over it for a week (since it was announced on the studio's facebook page) and decided to just go ahead with it. The studio had at that time also published their new rates card and the package was really a "not to be missed!". Got my sister to go down to the fair with me just so I can book the package and appointments. Hubby was overseas then and it was quite a feat trying to book an appointment that would fit his schedule. 

My studio of choice was (drum rollssss.....) The Studio Loft! I have always admired the photos on their Facebook page after knowing about them through my colleague who took family photos with them. There was just something that struck a cord with me - what I can't really tell. All I can say is I really love the photos. :p

The maternity photo shoot was enjoyable. I wanted to be a little more adventurous but I guess I got conscious because my older daughter was with me. I didn't want her to have the impression that it is perfectly ok to take photos without clothes (not that the poses were raunchy or that she will understand that I was taking it to remember the big tummy). 

The newborn photo shoot on the other hand was quite difficult. Baby M fussed for quite a bit and was not really co-operative - wanting to latch and latch and latch... It was really stressful and I really hated the first half of the photo shoot. My worry was that none of the photos were going to turn out right. That said Maryann was really calm and cool in handling babies (being a mother herself) and managed to take many pretty shots (yes I wanted to buy all but hubby the disciplined one said no. *bleah*). And there was Joanne who was there to lighten the mood and keep N in a perky mood for the sisters' portion. :)

It was a great experience and I would surely go back for another one if I were to get pregnant again. 
It's time for the reveal (do not worry... no NC16 or M18 photos will be posted here)...
The Bloom Shoot 

This is my favourite! N looking so sweet isn't it?
The Teeny Weeny Shoot 

Pardon me... But hubby wanted this finger sucking photo... :p

Aren't tiny feet cute?
The sleeping child...
That sweet smile

The sisters!!!
Love how the two of them look in this photo...
Angels...

 Papa Mama & Baby M 

Just the girls and I...
 Realised that this looks so much like the photo of me and the girls! *faint*